Showing posts with label wood cut. Show all posts

Wednesday, September 14, 2016

Mosquito paralysis


My first clumsy engravings were really carved almost without thinking.  I didn't really consider what I was doing. I had a block, and a couple of tools so I just cut them and printed the resulting image without giving any thought to how I was working or the still unknown ways of working in wood engraving.

After finishing my last simple Puppet engraving, I finally picked up a copy of Simon Brett's book,"Wood Engraving How to do it",  that I had purchased some time ago.   I must admit that going through it has sort of stopped me in my tracks.
There is a great deal of useful information and illustrations: this section on how to make a "sampler" of the tools and the different ways to consider letters is really helpful.
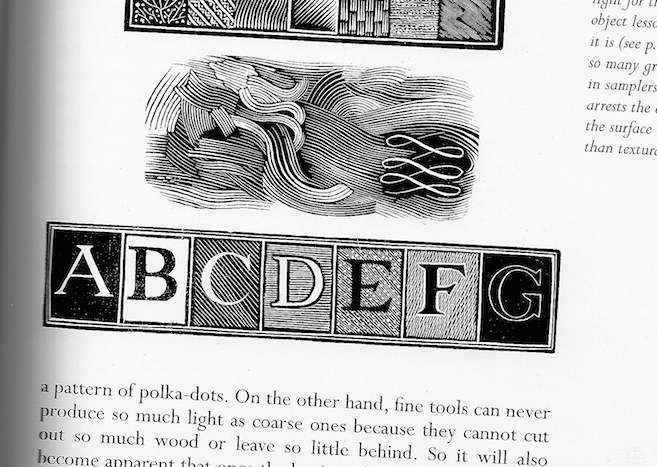
Illustration from Brett's book on engraving showing lettering styles.
But further on,  he discusses and illustrates the varying ways one can approach an image and this other series, illustrated to show multiple examples of the same image, engraved in differing ways has stopped me completely.  There are just too many choices--

Illustrations from S. Brett's Book on Engraving.

There are more examples--many more as this image gets resolved in many different ways and styles.
Many aren't suited to my work or habit but in theory, I should be pulling from these as needed when solving issues of tone and depth require differing techniques.

So I'm back to the block thinking: now what?
I've done enough trials on scrap wood that I'd like to try a piece of real boxwood and see what the smoother cutting and fine grain will allow.  I have a small off-cut of European Boxwood that I've been saving for a small work and I have an on-again, off-again series of parasites and small insects that I wanted to add to and I have many small mosquito thumbnails that I've drawn over the last weeks and from which I managed to cobble together an image I'm happy with.
The above photo shows my prepared drawing applied to the surface of my block. The block is just 2.5" in diameter so the image is pretty small.  So now I'm ready to go but I've been hesitating. Thinking for example of how to resolve the "tiger" aspect of the alternating black and white bands of the insect legs.
 And in this case, my small frail insect on a round of box can be resolved in lots of ways.....most of which I had never even considered until now.  The biggest decisions--whether to carve the insect as a white drawing lifted out of the black ground or to engrave around my drawing--preserving the drawing itself by cutting everything else away which is a bit more natural for me coming from my moku hanga experience.

The good news however is that while I've been procrastinating, mulling over in my mind what I think I'd like to do, I've been sharpening my tools. Slowly I've been selecting the gravers I'm likely to use, and they've been cleaned and sharpened and honed and then honed again and so are actually ready to cut.


Meanwhile, as I stare at the block, I have to keep the fan on as the mosquitoes are honing in on my exhaled CO2 and my bare ankles and calves under the table while I sit, inactive, thinking about the first cut.

Saturday, July 18, 2015

Braiding wood, paper and hair.

Early Proof state--the image is about 7.5 x 10".

I'm working to try to get a new print done for this year's AIMPE Awagami's International Mini Print Competition 2015 for works on Japanese washi (paper) and the deadline is nearing (July 30th).  I also committed to the Baren forum's quarterly print exchange and that too is due July 30th. The paper sizes are different,  with the former a standard A4 (8.25 x 11.5") while the latter is a bigger 10 x 15"....but after playing with half a dozen designs I settled on one I've been working on off and on for a few years that I knew would work well with both formats.

It's based on a drawing I did a few year's ago when my wife still had waist length hair that she would wear in a tangled braid.  I did an etching similar to this also a few years back but was never happy with that.

The basic concept is simple and fairly formal...a woman's head and back with the picture plane divided by the dark braid....but the variations are endless....and I've doodled simple, idealized, literal, and exaggerated backs and braids in many of the sketchbooks I've filled.
In this case these sketches were drawn from memory done to scale to fit an A4 sheet knowing that I could adjust the block to fit both paper sizes.

I settled on the bottom sketch which ,while not perfect,  gave me a little more room to play with the braid and blouse. I especially like the wispy hairs of the nape of the neck and the cloud of stray hairs that surround the head and braid.   It will be challenge to carve the hair and while I know how to cut the wispy ones, I haven't really figured out yet how to cut the head and braid themselves..nor how many blocks to dedicate to them.
I ordered a block of Cherry plywood for the keyblock from McClains...it has a good 1/8th inch layer of good cherry veneer and a 9 x 12 inch block should allow me to print both paper sizes.

I glued down the laser copy I made of the drawing and once the paste was dry I peeled back the outer layer of paper to reveal the image. With a thin coating of olive oil,  the remaining paper became translucent and I could follow the drawing to guide the cutting.
I'm using a 4.5 Hangi toh to outline all the hairs.
This particular piece of cherry was pretty dense. Carving was pretty straightforward--if slow-- but clearing the cut bits was harder than usual often requiring 4-5 passes with the toh and back cuts to get the pieces to finally separate from the block. The final carving of the mass of hair of the head and braids was cut with a V-gouge instead of the toh.


I proofed this block yesterday onto thin paper and glued 4 copies down to Shin blocks to start the color plates.  I lost a lot of the detail above and the braid is now a tangled mess. I like it but will need to tease out the definition of the braid better than it printed in the top photo.
But now I think I'll need an additional cherry block to resolve the hair.
