Showing posts with label sizing paper. Show all posts

Wednesday, April 1, 2015

Cut and Paste


While I was proofing my Leafhopper blocks I was also testing the last batch of sized paper.
As I predicted, the thinner papers didn't take the size too well--the size sat on the surface and dried very slowly--(they acted as if they were already sized). So they printed a bit unevenly and then dried  buckled and crinkled so I decided to back the better ones with wheat paste and washi..this will flatten them out but also, backed with white paper, will make them much more luminous.

Here I'm applying wheat starch glue with a brush across the back of the print and it will have a larger cut piece of Japanese paper glued on top and then pasted to a glass panel and door for drying.  Once dry I'll cut the print off the glass door leaving the backed print dry and flat.
I'll really need to find a better recipe for the the thinner papers, although the 100 % Kozo and the mixed but heavier papers both absorbed the size well and printed nicely.

I'll try to scan in one of the better ones when they're dry.

Saturday, November 9, 2013

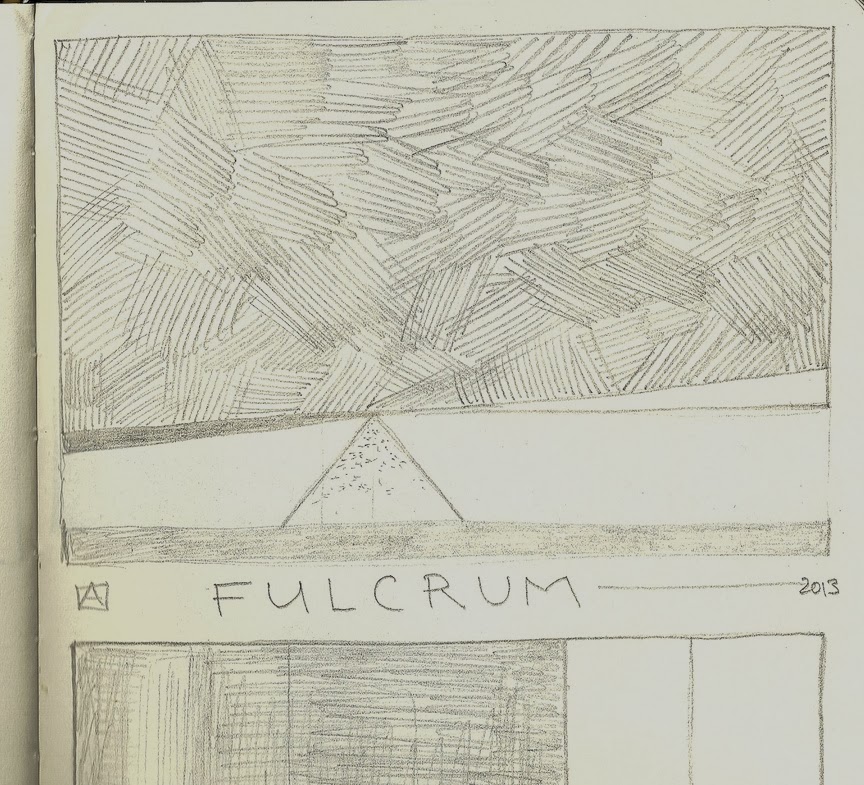
Fulcrum

Fulcrum, 6"x8" moku hanga, woodblock print

I moved into my new studio and finally had a chance to start in on the long backlog of prints I've been meaning to tackle in the last 2-3 Years.
But instead, a bit taken aback by the sudden freedom, I had trouble forging ahead and seemed a bit stuck.
Wood tends to be the muse that gets me thinking and in this case it was a box of 24 4"x6" Shina blocks I got on sale during the McClain's Summer Sale that got me working again. But, there are lots of ways to move. You can go forward, or backwards, or sometimes just pivot a bit while you wait for the momentum to build enough to get you actually moving.

This print is based on very simple drawing/a doodle really from my sketchbook done a few weeks ago--just a few lines making shapes that suggest other things.


The fulcrum is the subject and focal point but it's the large heavy mass above that interested me the most.

The color blocks were all carved in Okoume marine plywood--it has a pronounced wood grain that I tried to emphasize during the printing.

I printed this in two color variations--with either a blue or teal "sky".
One in blue and on thicker handmade paper and
Another in both color variations but on a variety of thinner papers.
All are printed on paper I sized during my last set of sizing experiments.

The only other significant variation is the addition of a subtle bokashi to the tip of the orange triangle to suggest a shadow from the mass above.
Fulcrum, 6"x8" moku hanga, color woodblock print
.


Printed from 6 blocks and about 12 color impressions.
EV of 50 on hand-sized, thinner weight, varied, Japanese papers and another smaller edition of 12 on heavy Misumi Japanese washi.


Saturday, January 21, 2012

Size Experiments: some results

Sized Paper: Lite size Left/Heavy size Right

I'll lead in with the results and discuss the nuances after.

I can detect very little difference in the prints printed on my heavily sized vs. lightly sized paper. The bigger surprise was that there was little difference on the paper that had NO size.

My experiments are with a paper called Hosokawa and is imported in Europe by Japico ( a wholesale paper importer). The booklet at the store where I bought it lists it as: 90%Kozo 10% pulp and weight 39g/M2.
(However--different sources list the same paper as having 20%-40% pulp and I expect the proportion has changed in the last years.) There are other papers listed in their catalog with heavier weights and higher kozo percentages that weren't available at my local store but would be worth trying to find or convince them to add/order. (I'd rather try sizing a 70g/m2 100% kozo paper...).

The store-side sizing test...( a small amount of saliva placed on a corner of the paper) shows that it is rapidly absorbed into a big wet spot---showing that the paper isn't sized. (Do this discreetly--the owners aren't keen on you touching the paper much less spitting on it...).

My first sizing attempt of this paper: 40g glue and 20alum to 1L water was unsuccessful. The paper stuck to itself and dried wavy, puckered and uneven.
There were however some decent pieces within the whole sheet and these I cut out and have used for this trial.
This is called HS (heavy size). There is a slight sparkle/glisten to the paper which means there is a little too much alum or it wasn't fully dissolved.(New Hosho paper--available from Woodlike Matsumura in Japan has similar sparkle).

My second sizing attempt used 14g Glue and 5g alum per Liter water.
Because in the second try I didn't size all the way to the end I have some strips that are partly sized on one half and unsized on the other.

HS is heavy size; LS is light size; NS is NO size.


Sized Paper LS Left/HS Right: light betaban block and bright yellow (2 impressions)

Sized Paper: NS (no size) Left/Light size (LS) Right (see arrows)

Multiple impressions(10?) Each sheet is 1/2 LS and 1/2 NS (see initials/arrows) Since these were registration mishaps--I printed them a little more aggressively after--darker colors/more layers to see what would happen.

Results Comments:
While printing, the unsized portion did tend to pill/pull up a little bit but as I continued printing this was less of an issue and by the end at 10-11 impressions it was still printing ok. The unsized portion is perhaps a little less brilliant/vibrant. In the half LS/half NS you can see a line of demarcation so there is a difference but it would be hard to tell which was which if they were unlabelled.
In the top photo; the dark cherry red background has at least 5 layers of printed pigment--that is a fair amount of printing for a light-weight paper but it tolerated it well. (light yellow beta ban;carmine twice;cad red/carmine mix once; pale green wash once;keyblock).
The heavy sized paper seemed to allow the pigment to rest a bit more on the surface but that was more noticeable in the first few impressions (see the yellow arrows) but there was little difference at the end. It didn't resist the pigment at all and I had no trouble printing on it (there was no resist).
This is a lighter paper than I usually use. At 39g/M2 it is fairly transparent and soft and in the first impressions it was probably a bit too damp. I'm not sure if I could handle a bigger sheet when damp. The small size of this sample and the small paper size (4" x 8") and the fact that I was intermittently switching from different sized papers may have altered the results; a bigger sheet might have revealed differences not visible on small printed surfaces. The unsized paper printed surprisingly well and I expect it would be serviceable if I keep the board/printing fairly "dry".

P.S. I did the saliva test again once the paper was dried...my little gob of spit didn't absorb at all in the LS and HS portions of my printed paper--but got soaked up instantly in the NS portion.
P.S.S. I also sized a piece of Japanese Hosho (probably 100%pulp) from a different store--it tried to fall apart as I was sizing it but once sized (LS) it printed ok too. See photo below:
LS Japanese "Hosho" content unknown but looks like 100% pulp/sulfite

Sunday, January 15, 2012

Glue and Alum, sizing paper at home; round two


Emboldened by encouraging words (and detailed instructions) from accomplished printmaker Paul Furneaux (who sizes his own paper) I decided to give it another go.

I'm using his Winter recipe; 14grams of animal-skin glue (rabbit) and 5 g of powdered alum to 1L of water. I soaked the glue in 1/2 the water overnight, then added another 1/2 liter of boiling water in the morning, stirred it all up (it dissolved nicely) then turned up the heat and added the small amount of alum, that I had already dissolved in a small cup of very hot water. I kept all this on a warm stove/flame in a make-shift double boiler to keep the glue mixture from getting too hot.

The interesting advice I got from Paul was to use an old blanket under my work station to act as a size catcher--and to move the brush slowly across the width saturating the paper with warm size (it will soak thru to the blanket). He doesn't stack it but then picks it up carefully and hangs it up to dry sheet by sheet. He urged to leave the last few centimeters unsized so as to have a dry, strong edge to lift it up.

I'm trying to size a fairly thin paper but that was available down the street at the local art-supply store and was practically the heaviest they had, the rest of their stock is used by bookbinders and for restoration work.
It is a handmade Japanese washi, 45g/M2 weight and 90%Kozo(mulberry) and 10% wood pulp.


Here's the table. Blanket is down, sheet of paper on top, smooth side of the paper (the printing side) is UP and will receive the size brushed out.


What I noticed:
This paper is strong enough that I didn't need to leave the unprimed edge. The one sheet I sized right to the edge was just as easy to handle and didn't tear.
This paper is pretty thin and I got some buckling where my thumb was used to hold it down to allow the brush to go over the paper.
Extreme care has to be taken to try to get the edges of the strokes almost touching as if they overlap and xtra layer of size goes down.
A bigger brush would be good. I thought of buying 2-3 of these and making a jig to hold them all together so they'd function as one big brush....but I decided to wait and see how these trials go.
Hung up they looked smooth and pretty good. There were some areas of skipped or double size but not too bad but in my Winter climate the rooms are all very dry and trying to place them in the one unheated room with the windows open (Damper outside than inside) still caused the paper to dry too quickly--they were dry to the touch in 30-40 minutes.
And I think the slight puckering/unevenness is due to the drying.
But this is much better than my first try and I think all the paper is useable.
Results?
The professionally sized paper I've been able to buy online still looks better and more uniform than these sheets that I've managed to produce at home. But this is much better than my last try so there's hope?

I need to let it rest/cure for a few days before I print on it.
The paper is still hanging in the room to rest/age/cure/loosen up.
It feels stiffer and has more body than it did unsized.
I sized BOTH sides of one sheet and will pull a few proofs of a small print from each of these trials later this week and I'll post pics of those once they're done.

Saturday, December 3, 2011

Sizing Disaster

One good corner....
I'll lead in with the one good corner of the one good (well, usable) half sheet from my first attempt at sizing my own paper. I used--I thought--a relatively weak recipe:
45g rabbit-skin glue to 23 g alum to one liter of water.
Sizing pot/double boiler
Work Station

But before anyone thinks they want to follow my example here are the rest of the sheets:

I think my size was too strong--too much gelatin anyway-- and I tried stacking the sheets to "even out the moisture" but even after the 4-5 minutes I needed to brush out 5-6 half sheets, I couldn't then get them apart, and attempting to pull them apart they stretched and pulled fibers off. The paper was a bit soft and thin and once dampened with size it just got too soft and rippled with the moisture. Those ripples became creases and areas that would catch the size and while I didn't get any dripping there was definitely too much size at the R and top side of the paper where the brush, moving R to L would touch down.
The one decent sheet I got was one I brushed out alone, immediately hanging it to dry.

They didn't look too bad hanging but they dried curled, uneven, puckered and mottled.
Despite the damp outside, our indoor heating (radiant floor and bright dry day inside) I think contributed to the paper drying too fast.

At any rate--it is almost completely to trash--I did cut down the better halves of each sheet and I'll try printing on them; I hope when they are dampened and printed on they might even or flatten out a bit but I fear that the wavy bits will dry that way even once they're printed.

I have a few ideas for next time and despite this result, I do want to have another try:

--more hands. A helper would have been very helpful--hanging the sheets was more of a hassle/problem than I imagined (clothespins didn't hold, pieces fell off...)
--smaller 1/2 liter batch to try 3-4 sheets only--I didn't use all the size I made and wanted just enough to be able to fill the brush and try it out.
--half the gelatin--I think it was just too thick/gluey.
--hang each sheet as soon as it is brushed rather than trying to stack them.
--turn off the heat in the room where they'll dry. I need to slow the drying time down so they don't curl so much.

On the good side the small pieces of paper that don't look too bad have a nice feel.
The 40g/m2 paper that was a bit thin and soft definitely has more body and feels like it would be good to print on if it wasn't just so badly sized.