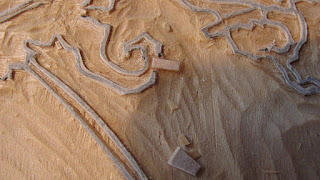
I'm pushing the limit of this particular piece of Shina Plywood. I can carve thinner lines but the glue holding the veneer firm is not always uniform and pieces will pop off. Sometimes due to a slip of the chisel and sometimes not. (A careful look at the photos will show that I gave myself some extra space while carving--I'm a good 1-2mm away from my hanshita lines but I still had a good 8-9 slips/losses/gaps.)
It's a offshoot of Murphy's law that a small loss of line is always in a critical area and not some irrelevant spot. It's always the eye or nose or a letter etc.
In this case it is the Maple seed that will be the focus of the image.
Here are a few photos of the slips (but already with repairs in progress).
I've already taken a little shina --taken off the surface with a flat chisel and cut into wedge shapes or narrow rectangles and these have been glued into the space left by a lost piece.
I've opened up the spaces a bit to give me more room and tried to flatten the bottom of both the receiving board and the wood plug.
They are allowed to dry and then the next day carefully trimmed to match the original lines. A wood glue for exteriors is best (won't come off when wet like Elmer's white glue will).
I didn't have any so used a local Italian glue that looked and smelled like airplane glue and wasn't ideal.
Here are the repairs after they've been trimmed:
And here is one view of the test proof I took today to check the keyblock.
Not invisible, but not bad.
I do take care to shave the top flat so the repair is flush with my keyblock.
With a little more care to cut the plugs to fit better and the right glue the repairs can be undetectable once printing gets underway and the small gaps fill in.
Friday, December 9, 2011
Oops--Woodblock slips, lost wood and repairs.
Subscribe to:
Post Comments (Atom)


Perfect timing for me with this post. I was just about to ask Barenforum how they make repairs. Your pictures say a 1000 words. Thanks for sharing!
ReplyDeleteNice repair. I use Elmer's wood glue or Gorilla wood glue and a wee, little paint brush. And yes, it always happens where I don't want it to, also.
ReplyDeleteThese repairs are a bit flimsy--I'm not planning on printing many copies but if I wanted a better result I'd cut out a little recess where the repair will go so it can be a thicker piece.(and take off a small horizontal slice with the chisel or pull saw). But if the glue is decent (a good wood epoxy) Even the 1/16th-1/8th inch thick piece I set in will do fine. Just be careful not to get glue on the top of the plug or surrounding wood that will print or it will act as a resist when you go to print if you're working with water-based pigments.
ReplyDeletethis is very very interesting!
ReplyDeletethanks a lot for sharing.